Run NVIDIA Audio Flamingo 3 on Nebula Block – Fast, Scalable Inference
As the field of audio intelligence advances, NVIDIA’s Audio Flamingo 3 has emerged as a cutting-edge model designed to revolutionize how we interact with audio data. With its ability to process up to 10 minutes of audio, generate chain-of-thought reasoning, and support multi-audio chat, AF3 is a powerful tool for developers and researchers working on next-gen audio applications.
Enter Nebula Block — the perfect environment for running Audio Flamingo 3 seamlessly.
Understanding Audio Flamingo 3
Audio Flamingo 3 (AF3) is a fully open, state-of-the-art Large Audio-Language Model (LALM) designed to push the boundaries of audio understanding across speech, environmental sounds, and music. Building on prior advancements, AF3 introduces key innovations, including:
- Unified representation for diverse audio types (speech, sound, music).
- Flexible chain-of-thought reasoning on demand.
- Long-context comprehension for audio inputs up to 10 minutes.
- Multi-turn, multi-audio dialogue support via AF3-Chat.
- Voice-to-voice interaction capabilities.
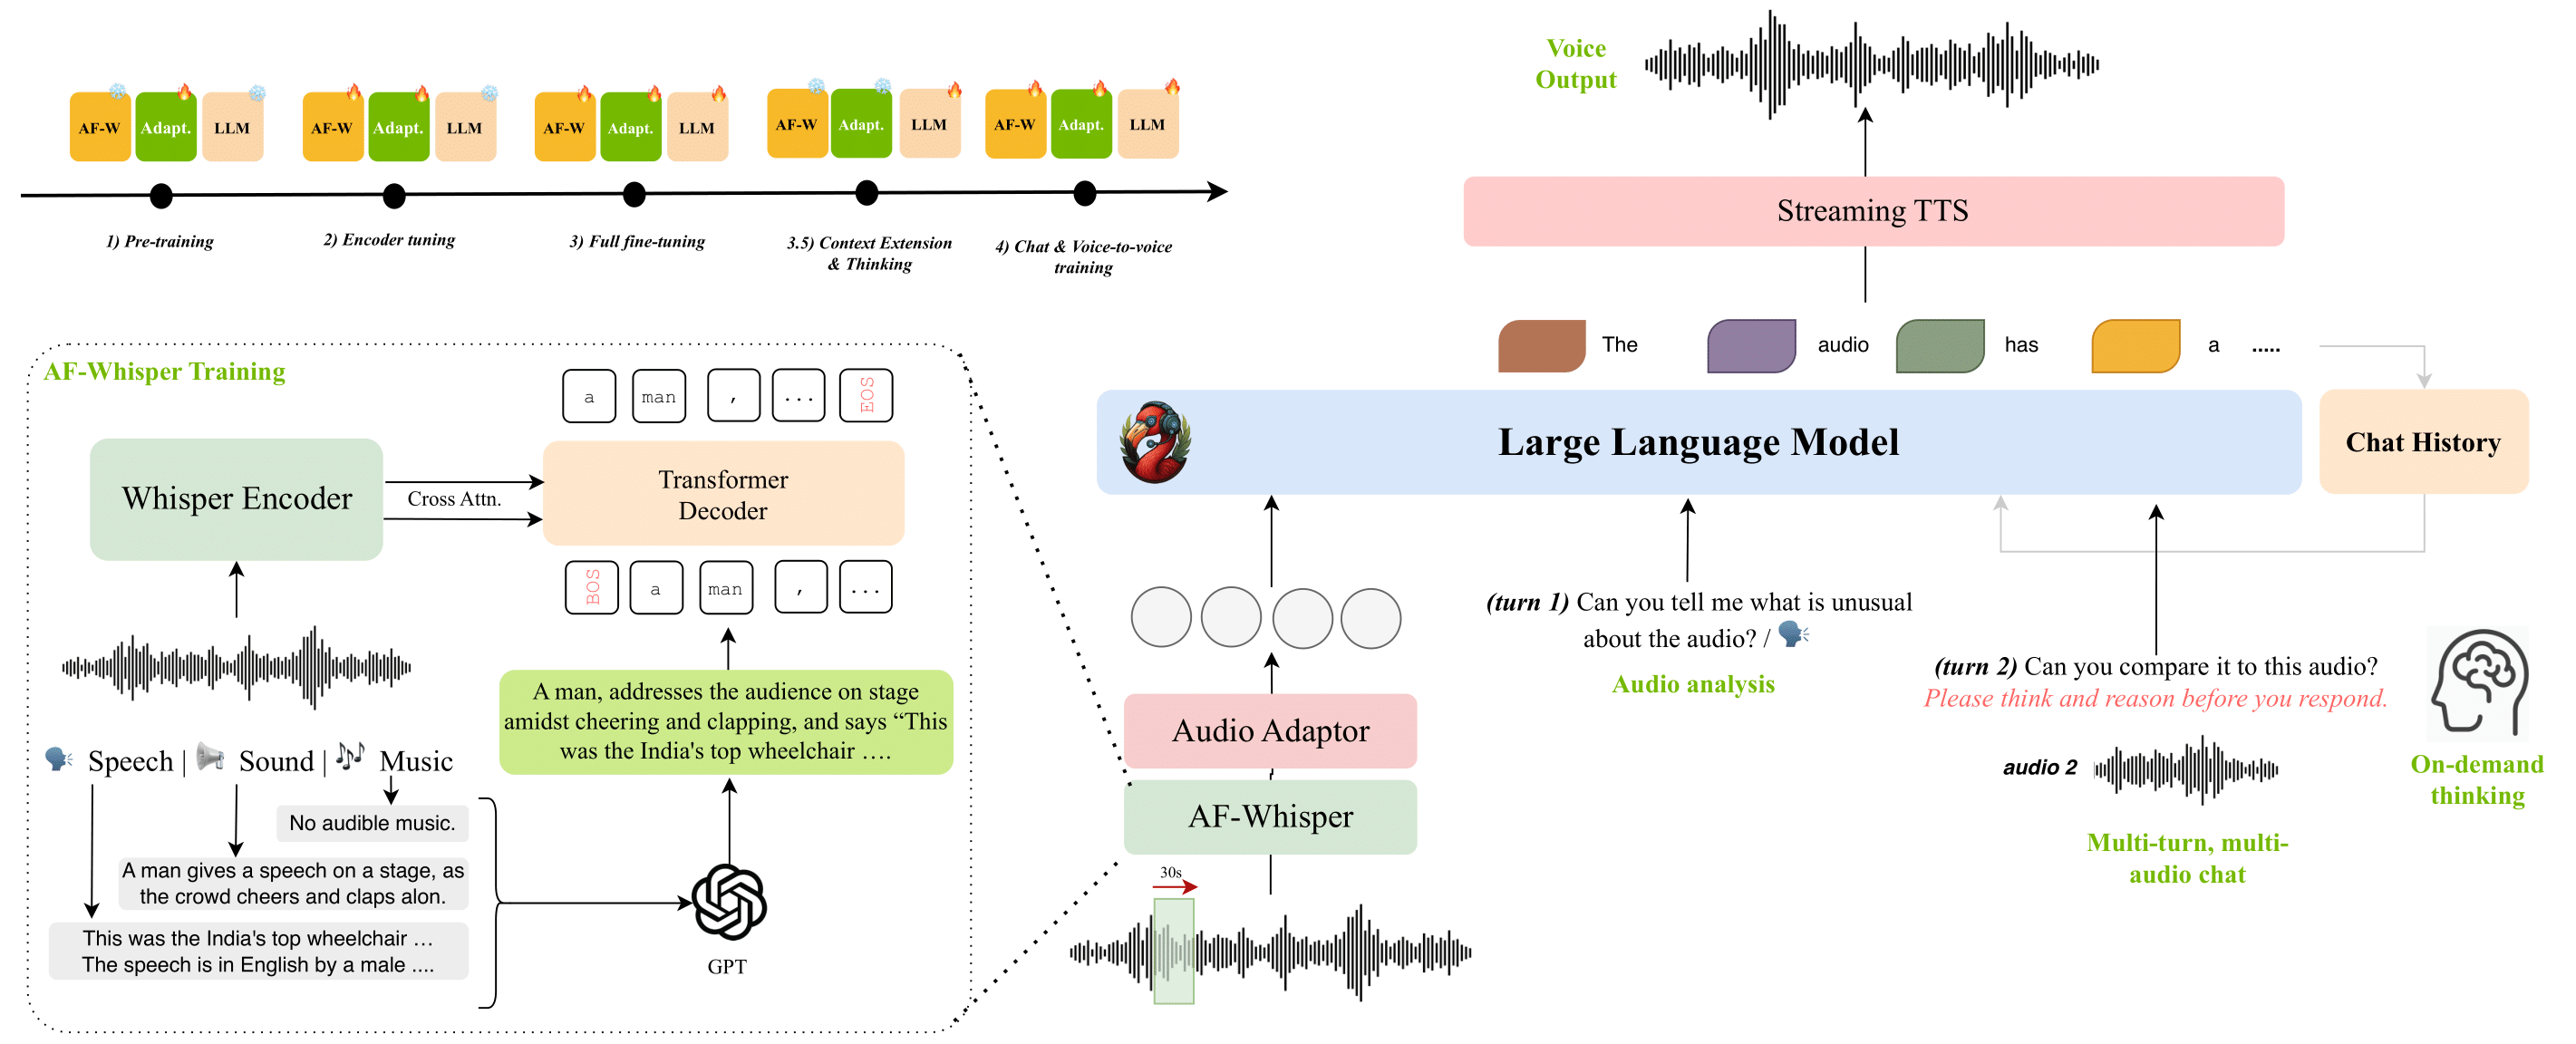
AF3 has been extensively evaluated and sets new performance benchmarks across 20+ public tasks in audio reasoning and understanding.
Note: This model is intended for non-commercial research use only.
Why Nebula Block is the Ideal Platform
1. High-VRAM GPUs
Processing complex audio models like Audio Flamingo 3 requires serious GPU memory. Nebula Block offers:
- NVIDIA A100 – Up to 80 GB VRAM, perfect for large-scale inference.
- NVIDIA H100 – Latest generation GPU with superior bandwidth and CUDA cores for demanding audio workloads.
2. Fast SSD Storage
Speed matters. Nebula’s high-speed SSDs reduce data bottlenecks, allowing fast read/write access to large audio files — key for smooth inference performance.
3. Easy VM Setup
No delays. Launch pre-configured VMs in minutes, complete with essential AI frameworks. Focus on running your model, not managing infrastructure.
4. Canadian Sovereignty & Compliance
For users concerned with data residency and compliance (especially in healthcare, finance, or public sectors), Nebula Block offers sovereign AI infrastructure—fully hosted in Canada with full control over data locality.
5. Global Edge Infrastructure
Even though it's Canada-based, Nebula Block has global nodes for low-latency inference—making it viable for users worldwide.
Step-by-Step Guide to Run Audio Flamingo 3 on Nebula Block
Step 1: Sign Up and Log In
- Create an Account: Go to Nebula Block and sign up.
- Log In: After registration, log into your account to access the Nebula Block dashboard.
Step 2: Generate SSH Key
- Create an SSH Key
- If you don't already have an SSH key, generate one using the following command in your terminal:
ssh-keygen -t rsa -b 4096 -C "your_email@example.com"- Follow the prompts to save your key, usually in
~/.ssh/id_rsa.
- Add Public Key to Nebula Block
- Copy your public key:
cat ~/.ssh/id_rsa.pub - Navigate to SSH keys section to add your public key for secure access.
Step 3: Create an Instance
- Choose Your GPU Instance
- Go to the "Instances" section on your Nebula Block dashboard.
- Select the appropriate GPU instance based on your workload needs; for AF3, consider A100 or H100.
- Configure Instance Settings
- Specify the instance name, region, SSH key, and operating system based on your requirements.
- Launch the Instance
- Review your configurations and click “Deploy”.
Step 4: Install Audio Flamingo 3
- SSH into Your VM: Use SSH to connect to your VM once it is up and running.
ssh -i your_private_key username@your_instance_ip
- Download and Install Miniconda
# Download Miniconda for Linux x86_64
wget https://repo.anaconda.com/miniconda/Miniconda3-latest-Linux-x86_64.sh

# Make it executable and install
bash Miniconda3-latest-Linux-x86_64.sh
👉 Follow the on-screen instructions. Once finished, type:
exitThen reconnect:
ssh -i your_private_key username@your_instance_ip
- Update System and Create Environment
sudo apt update

# Create and activate a virtual environment using Python 3.10
python3.10 -m venv flamingo-env
source flamingo-env/bin/activate
- Install PyTorch, Dependencies, and CUDA Toolkit
# Upgrade pip
pip install --upgrade pip

# Install PyTorch with CUDA 12.1 support
pip install torch torchvision torchaudio --index-url https://download.pytorch.org/whl/cu121

# Install required libraries
pip install gradio peft huggingface_hub hydra-core loguru soundfile librosa \
            openai-whisper ftfy jiwer einops wandb kaldiio matplotlib \
            opencv-python-headless pydub pytorchvideo==0.1.5

# Install CUDA Toolkit via Conda (if using Conda)
conda install nvidia/label/cuda-12.4.0::cuda-toolkit -y

# Install specific versions of DeepSpeed and Transformers
pip install deepspeed==0.15.4 transformers==4.46.0
- Clone Repository and Download Model
# Clone the main repository
git clone https://github.com/zsxkib/cog-nvidia-audio-flamingo-3.git
cd cog-nvidia-audio-flamingo-3

# Log in to Hugging Face (required to download the model)
huggingface-cli login  # Enter your Hugging Face token

# Install Git LFS to download large model files
git lfs install

# Clone the official Audio Flamingo 3 model from Hugging Face
git clone https://huggingface.co/nvidia/audio-flamingo-3
Step 5: Run the Model
- Execute the Model
Use the command:
CUDA_HOME=/usr/local/cuda python app.py \
When you run app.py, Gradio will start a local and public web server. If successful, you'll see output like:
* Running on public URL: https://xxxx.gradio.live


This share link expires in 1 week. For free permanent hosting and GPU upgrades, run `gradio deploy` from the terminal in the working directory to deploy to Hugging Face Spaces (https://huggingface.co/spaces)- View the Output (via Web UI)
Open the public URL (e.g. https://xxxx.gradio.live) in your browser to interact with the Audio Flamingo 3 model through a simple web interface.
You can:
- Upload your own
.wavfile (16kHz mono recommended) - Enter prompts like: "Describe the audio in detail"
- View results directly in the browser.
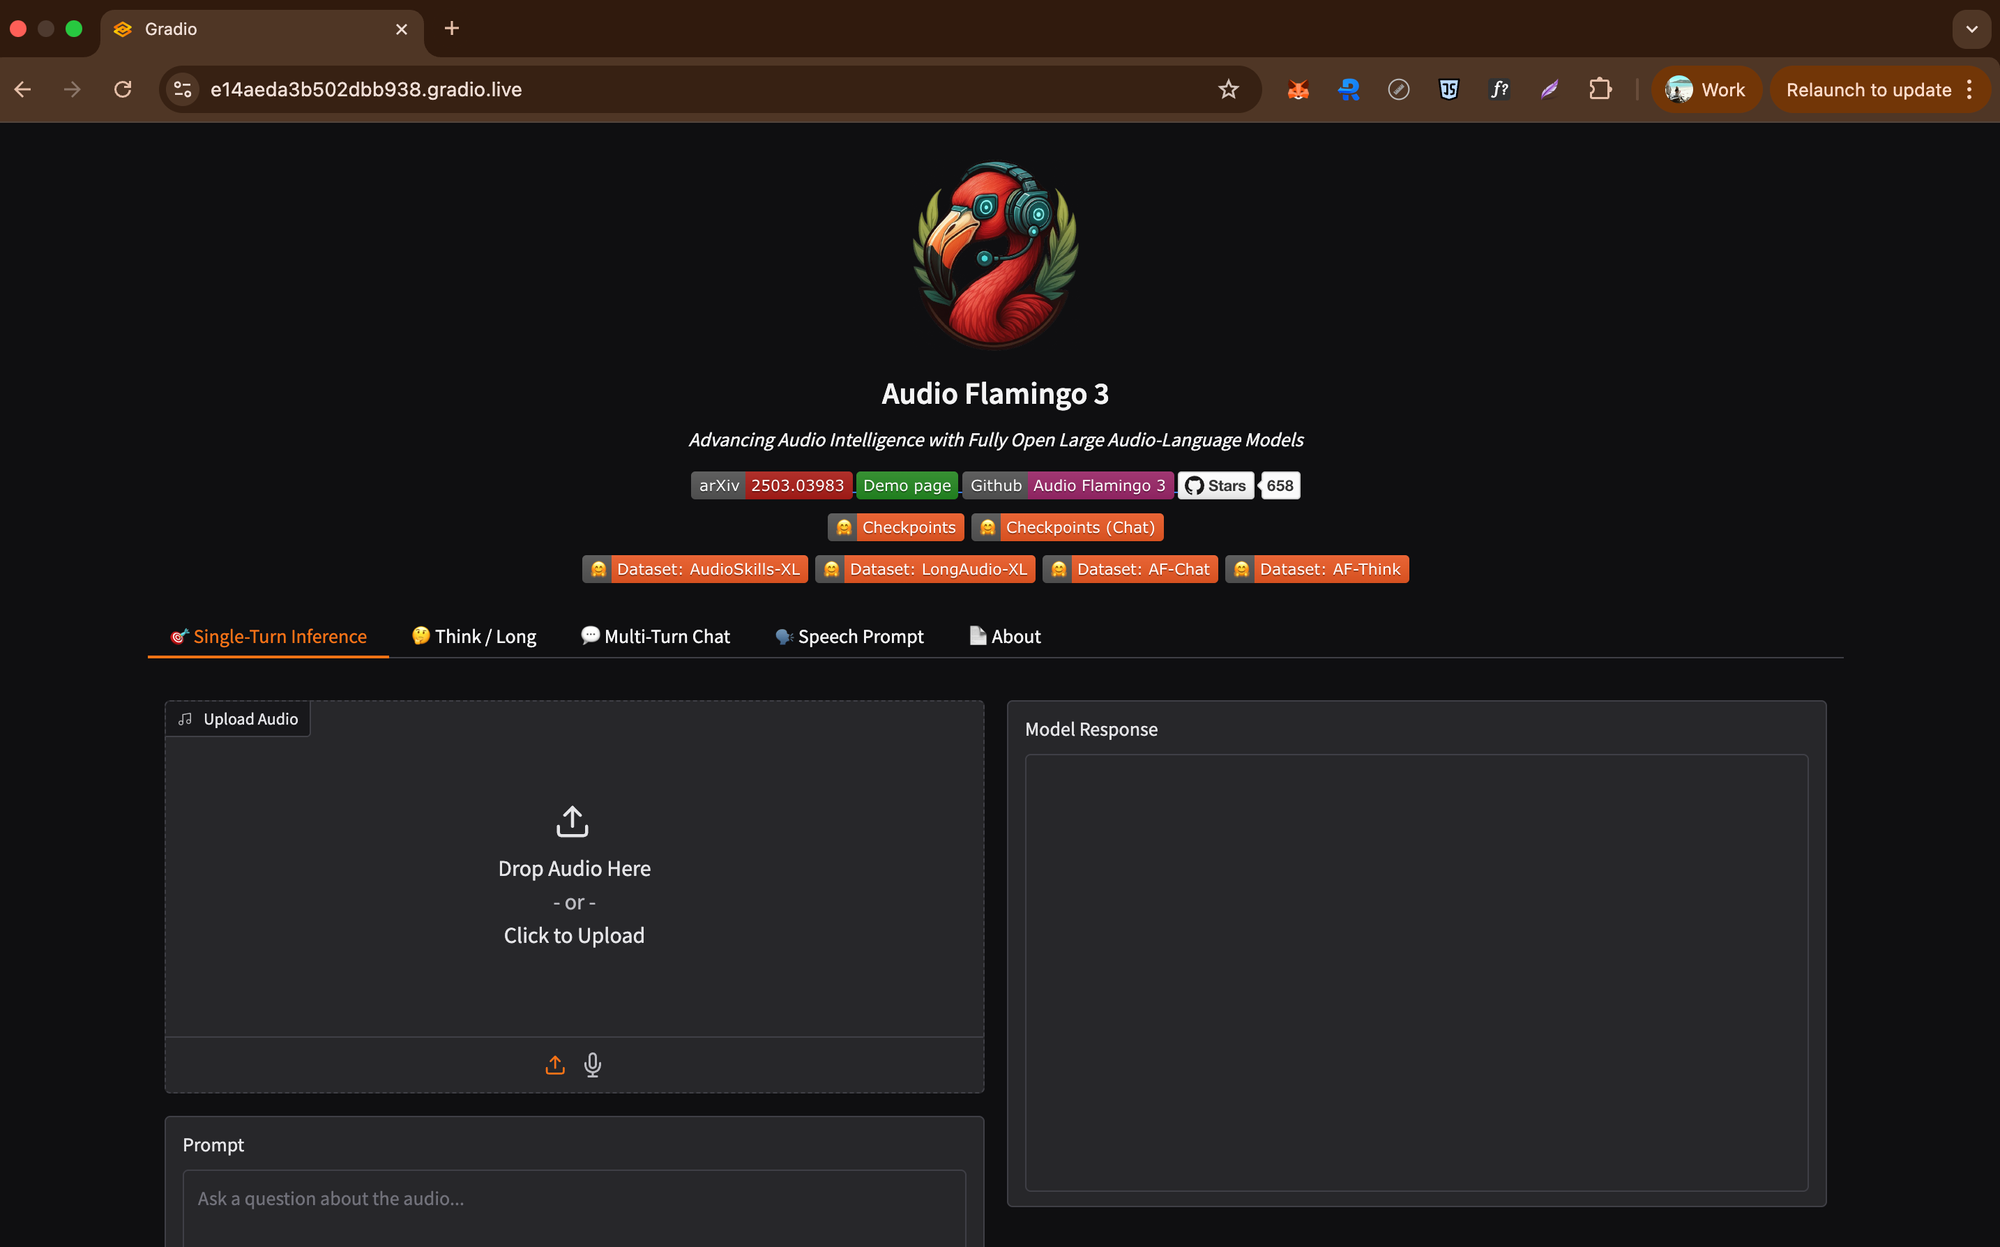
📝 Note: This public Gradio link expires in 1 week.
Something you can try
# Describe the content or sounds
sudo cog predict -i audio=@my_song.wav -i prompt="Describe the sound in this audio"

# Transcribe spoken words
sudo cog predict -i audio=@interview.wav -i prompt="Provide a full transcription of the spoken content"

# Analyze musical structure with step-by-step reasoning
sudo cog predict -i audio=@track.wav -i prompt="Break down the musical composition and explain its structure step by step" -i enable_thinking=true

# Summarize a specific segment
sudo cog predict -i audio=@podcast.wav -i prompt="Summarize the conversation or topic discussed in this segment" -i start_time=120 -i end_time=300
Conclusion
Deploy Audio Flamingo 3 on Nebula Block to tap into high-VRAM GPUs, fast SSDs, and instant VM access—making it easy to run NVIDIA’s latest audio AI with minimal setup and maximum efficiency.
If you have questions or need assistance while setting up your model, feel free to reach out to our support team!
Nebula Block: Canada’s First Sovereign AI Cloud
Nebula Block is the first Canadian sovereign AI cloud, designed for performance, control, and compliance. It offers both on-demand and reserved GPU instances, spanning enterprise-class accelerators like NVIDIA B200, H200, H100, A100, L40S, down to RTX 5090, 4090, and Pro 6000 for cost-effective experimentation. Backed by infrastructure across Canada and globally, Nebula Block supports low-latency access for users worldwide. It also provides a wide range of pre-deployed inference endpoints—including DeepSeek V3 and R1 completely free, enabling instant access to state-of-the-art large language models.
Next Steps
Sign up and explore now.
🔍 Learn more: Visit our blog and documents for more insights or schedule a demo to optimize your search solutions.
📬 Get in touch: Join our Discord community for help or Contact Us.
Stay Connected
💻 Website: nebulablock.com
📖 Docs: docs.nebulablock.com
🐦 Twitter: @nebulablockdata
🐙 GitHub: Nebula-Block-Data
🎮 Discord: Join our Discord
✍️ Blog: Read our Blog
📚 Medium: Follow on Medium
🔗 LinkedIn: Connect on LinkedIn
▶️ YouTube: Subscribe on YouTube